Posts

Showing posts with the label Linux Commands

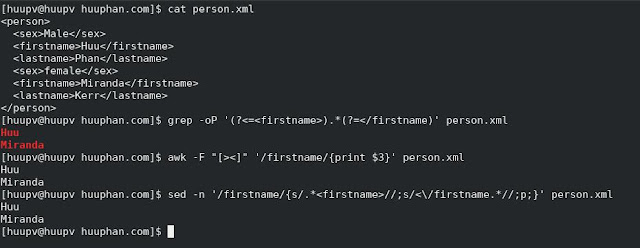
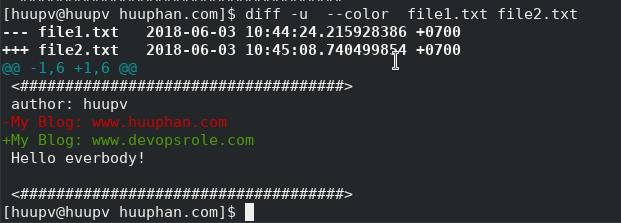
Linux commands cheat sheet

System Commands Command Description Examples shutdown bring your system down shutdown -h now --> Halt or poweroff after shutdown shutdown -r now --> Reboot after shutdown halt stop your system. halt reboot reboot your system. reboot uptime Tell how long the system has been running. uptime runlevel find the previous and current system runlevel. runlevel printenv print all or part of environment printenv env run a program in a modified environment env hostname show or set the system's your host name hostname --> show the system's host name hostname newhostname -->- set the system's uname print system information uname -a --> print all information locale Displays information about the current locale, or ...

Run bash script on boot time on centos

Image
Introduction Automating tasks at startup is essential for server administration, ensuring services and scripts execute without manual intervention. CentOS , a popular Linux distribution, provides multiple ways to run bash scripts on boot time. This guide covers various approaches, their use cases, and step-by-step implementations. Methods to Run a Bash Script on Boot Time on CentOS 1. Using crontab with @reboot Cron jobs are a powerful way to schedule tasks. The @reboot directive in crontab allows executing scripts upon system startup. Steps: Open the crontab editor: crontab -e Add the following line: @reboot /path/to/your/script.sh Save and exit. Ensure the script has executable permissions: chmod +x /path/to/your/script.sh Pros: Simple and effective. Cons: Requires crontab configuration and user-specific settings. 2. Using systemd service (Recommended for CentOS 7+) Systemd is a modern service manager that provides better control over startup scripts. Steps: Create a new system...

Linux create user Using `useradd`

Image
Introduction Learn how to create and configure a user in Linux using the `useradd` command. This comprehensive guide covers creating a user, assigning groups, and configuring sudo privileges without a password. Managing user accounts is a fundamental task for any Linux system administrator. Whether you are setting up a new server or adding users to an existing system, understanding how to create and configure users efficiently is crucial. In this tutorial, we will explore how to use the `useradd` command to create a new user in Linux, assign them to specific groups, and enable them to execute sudo commands without requiring a password. Why Use `useradd` for User Creation? The `useradd` command is a powerful tool that allows system administrators to create user accounts with specific options such as User ID (UID), Group ID (GID), home directory, shell, and more. Unlike graphical user interfaces, `useradd` provides a streamlined way to automate user creation through scripts, making it i...

Shell script parse xml in linux

Image
How to use shell script parse xml file . In this tutorial, I will use grep command, awk command and sed command Reading xml file extracting value in linux . For example xml person file as below <person>   <sex>Male</sex>   < firstname >Huu</ firstname >   <lastname>Phan</lastname>   <sex>female</sex>   < firstname >Miranda</ firstname >   <lastname>Kerr</lastname> </person> How to extracting value Huu and Miranda  of < firstname > < /firstname > Use grep command [huupv@huupv huuphan.com]$ grep -oP '(?<=<firstname>).*(?=</firstname)' person.xml Use awk command [huupv@huupv huuphan.com]$ awk -F "[><]" '/firstname/{print $3}' person.xml Use sed command [huupv@huupv huuphan.com]$ sed -n '/firstname/{s/.*<firstname>//;s/<\/firstname.*//;p;}' person.xml  The result, Shell script parse xml in linux

rename command in linux

Image
rename command similar with mv command. This command is slightly more advanced than mv  command. How to rename multiple files in linux. The syntax rename command rename [options] expression replacement-file For example, basic use rename command [huupv@huupv huuphan.com]$  rename file huu file1.txt The same output How to rename all file extension .txt to .atxt file [huupv@huupv huuphan.com]$ rename .txt .atxt *.txt The same output Use option --verbose in rename command [huupv@huupv huuphan.com]$ rename -v foo huu foo?.atxt The same ouput `foo2.atxt' -> `huu2.atxt' `foo3.atxt' -> `huu3.atxt' Details more information rename command man rename

Linux diff command

Image
In this tutorial, I use diff command output on screen. How to compare different line by line in  files. How to compare side by side, color , output do not output common lines with diff command. What diff command work? compare files line by line For example my topic, I compare line by line in 2 file: file1.txt and file2.txt The content file1.txt file [huupv@huupv huuphan.com]$ cat file1.txt <####################################> author: huupv My Blog: www.huuphan.com Hello everbody! <####################################> The content file2.txt file [huupv@huupv huuphan.com]$ cat file2.txt <####################################> author: huupv My Blog: www.devopsrole.com Hello everbody! <####################################> The default compare line by line with diff comand [huupv@huupv huuphan.com]$ diff file1.txt file2.txt The output as below: 3c3 < My Blog: www.huuphan.com --- > My Blog: www.devopsrole.com The output nu...

Openssl libssl.so.1.1 not found solve problem

How to solve problem Openssl libssl.so.1.1 not found on your system such as centos, ubuntu. Installing openssl missing depens libssl.so.1.1 not found and libcrypto.so.1.1 not found. Openssl libssl.so.1.1 not found problem as below: [huupv@huupv ~]$ ldd /usr/bin/openssl     linux-vdso.so.1 (0x00007ffe185e6000)     libssl.so.1.1 => => not found     libcrypto.so.1.1 => => not found     libz.so.1 => /lib64/libz.so.1 (0x00007fc3ca6f4000)     libdl.so.2 => /lib64/libdl.so.2 (0x00007fc3ca4f0000)     libpthread.so.0 => /lib64/libpthread.so.0 (0x00007fc3ca2d2000)     libc.so.6 => /lib64/libc.so.6 (0x00007fc3c9f1c000)     /lib64/ld-linux-x86-64.so.2 (0x00007fc3cb2a1000) Openssl libssl.so.1.1 not found solve problem sudo ln -s /usr/local/lib64/libssl.so.1.1 /usr/lib64/libssl.so.1.1 sudo ln -s /usr/local/lib64/libcrypto.so.1.1 /usr/lib64/libcr...

Mastering the sed command regex example for Linux

Image
Introduction The sed command in Linux is a powerful stream editor that allows users to filter and transform text in various ways. Whether you're working on system administration tasks or programming scripts, mastering sed can significantly improve your efficiency. In this tutorial, we will explore how to use sed with regex to manipulate lines within a file, focusing on printing lines from one point to another. This guide will help you understand the nuances of sed and its regex capabilities, ensuring you can handle text processing with ease. What is the sed Command? The sed (stream editor) command in Linux is used to perform basic text transformations on an input stream (a file or input from a pipeline). It is commonly used for text substitution, but it also allows you to select and manipulate lines, delete text, and more, using regex (regular expressions). Key Features of sed Text Substitution : Replace occurrences of a pattern with a specific string. Line Selection : Selec...

centos change ssh port

in this tutorial, How to change ssh port another with selinux. The default ssh port 22, when you change port another with rules selinux (SELINUX=enforcing) get error can't change ssh port. Solve problem!( Running command following with root account) File selinux with content SELINUX=enforcing as below: [huupv@huupv ~]$ sudo cat /etc/sysconfig/selinux [sudo] password for huupv: # This file controls the state of SELinux on the system. # SELINUX= can take one of these three values: #     enforcing - SELinux security policy is enforced. #     permissive - SELinux prints warnings instead of enforcing. #     disabled - No SELinux policy is loaded. SELINUX=enforcing # SELINUXTYPE= can take one of these three values: #     targeted - Targeted processes are protected, #     minimum - Modification of targeted policy. Only selected processes are protected. #     mls...

Centos 7 managing services with Systemd

Centos 7 managing services with Systemd. -List all the current loaded targets as command below: $ sudo systemctl list-units -t target Each services has 3 states; enabled, disabled and static. - To list enabled services as command below: $ sudo systemctl list-unit-files --type=service | grep enabled - To start/stop/restart services as command below: # systemctl status <servicename> # systemctl stop <servicename> # systemctl start <servicename> # systemctl restart <servicename> - To check running ntp services as comman below: $ sudo systemctl list-units --type service --all | grep ntp - Set the service to start a boot: # systemctl enable <servicename> - Disable service start-up boot # systemctl disable service The update later related command line "Centos 7 managing services with Systemd" in this article.

List the contents of tar gz file

tar command is archiving utility. Something, you can retrieve extension .tar.gz or .tar.bz2 file. How to list the contents this without extracting from command line. The syntax tar command as below: tar OPTION File_Name With OPTION : t, --list : List the contents of an archive v : Verbosely list files processed j : Filter archive through bzip2 f : filename  You may reading link as below: Iptables how to How to reset password on centos 7 Bash script example List the contents of .tar.gz file To use tar command for .tar.gz as following: $ tar -tvf links-2.12.tar.gz  The output of links-2.12.tar.gz file as below: -rwxr--r-- 1000/1000      1215 2001-10-05 14:03 links-2.12/mailcap.pl -rwxr-xr-- 1000/1000      4654 2015-06-28 22:13 links-2.12/rebuild -rw-r--r-- 1000/1000       461 2003-05-06 01:10 links-2.12/links_16x16_1.xpm -rw-r--r-- 1000/1000      2410 2003-05-...

awk useful commands examples

awk useful comand examples. How to Output Field Separator Variable, Number of Fields in a record, To print Non-system users and ignoring "nobody" etc.  You may reading link below : How to reset root password on centos 7 CentOS/RHEL Use yum Command To Downgrade Upgrade or Rollback Updates Generate and Verify Files with MD5 Checksum in Linux use inotify-tools on centos For example, the output passwd file use awk command $ cat /etc/passwd | awk -F':' 'BEGIN{ print "Name\tUID,GID\tHomeDirectory" }{print $1"\t"$3,$4"\t"$6}' The output as below: Name UID,GID HomeDirectory root 0 0 /root bin 1 1 /bin daemon 2 2 /sbin adm 3 4 /var/adm lp 4 7 /var/spool/lpd sync 5 0 /sbin shutdown 6 0 /sbin halt 7 0 /sbin mail 8 12 /var/spool/mail operator 11 0 /root games 12 100 /usr/games ftp 14 50 /var/ftp nobody 99 99 / systemd-bus-proxy 999 998 / systemd-network 192 192 / dbus 81 81 / polkitd 998 997 / tss 59 59 /dev/null s...

CentOS/RHEL Use yum Command To Downgrade Upgrade or Rollback Updates

Use yum Command To Downgrade Upgrade or Rollback Update. How to downgrade the package? How to upgrade the package? How to rollback update the package?. I'm running commands with root account. You may reading link below : How to reset root password on centos 7 Generate and Verify Files with MD5 Checksum in Linux use inotify-tools on centos awk useful commands examples How to  Downgrade Upgrade package use yum command The basic syntax Downgrade package yum downgrade package1 yum downgrade package1 package2 showing multiple versions of a package yum --showduplicates list package For example How to Downgrade php-fpm 7.0.21 roll-back php-fpm 5.3.3 yum downgrade php-fpm The output as bellow Resolving Dependencies --> Running transaction check ---> Package php-fpm.x86_64 0:7.0.20-1.el6.remi will be a downgrade --> Processing Dependency: php-common(x86-64) = 7.0.20-1.el6.remi for package: php-fpm-7.0.20-1.el6.remi.x86_64 ---> Package php-fpm.x86_64 0:7.0...

Generate and Verify Files with MD5 Checksum in Linux: A Complete Guide

Introduction Learn how to generate and verify MD5 checksums in Linux with step-by-step instructions. This comprehensive guide will help you ensure file integrity using MD5 checksums, complete with practical examples. File integrity is a crucial aspect of managing data on any Linux system. Whether you're handling sensitive information, distributing software, or simply ensuring that your files haven't been tampered with, MD5 checksums offer a straightforward solution. An MD5 checksum is a 128-bit character string that acts as a unique fingerprint for a file. In this guide, we will cover how to generate and verify MD5 checksums for your files, including creating a sample directory with files for practical demonstration.   What is an MD5 Checksum? An MD5 checksum is a 32-character hexadecimal number generated by the MD5 (Message-Digest Algorithm 5) cryptographic hash function. This checksum is used to verify the integrity of files, ensuring that they have not been altered or corr...

How to reset root password on centos 7

Image
Many methods to reset root password centos 7. if GRUB 2 bootloader then no longer using in single-user mode as well as emergency mode. To below step by step to reset root password centos 7. You may reading link below : awk useful commands examples CentOS/RHEL Use yum Command To Downgrade Upgrade or Rollback Updates Generate and Verify Files with MD5 Checksum in Linux use inotify-tools on centos Step 1: Start the system, on Grub 2 boot screen, you press the e key as shown below. Step 2: In linux16 line or linuxefi on UEFI system, add parameters end line as shown below. rw init=/bin/bash Using Ctrl+A press or Ctrl+E press to start or end a line. Disable paramenters the rhgb and quiet in order to enable system message as shown top. Step 3: you press Ctrl+x to start single user mode passwd Step 4: update selinux information touch /.autorelabel Step 5: To resume the initialization and finish the system boot. exec /sbin/init Video how to reset root password on cen...

A Comprehensive Guide to use inotify-tools on centos

inotifywait - wait for changes to files using inotify. When it comes to real-time monitoring of file system events, inotify-tools is an indispensable tool. Especially for CentOS users, mastering inotify-tools can significantly enhance the efficiency of system administration tasks. This guide will walk you through everything you need to know about using inotify-tools on CentOS, from installation to advanced configurations, ensuring that you can leverage its full potential. Introduction to inotify-tools Inotify-tools is a command-line utility that leverages the inotify (inode notify) feature of the Linux kernel, allowing you to monitor file system events. This is incredibly useful for tasks that require real-time responses to file changes, such as automatic backups, log monitoring, and dynamic content updates. Why Use inotify-tools on CentOS? CentOS is widely used in enterprise environments due to its stability and robust performance. By integrating inotify-tools, you can automate and...