Posts

Lock and Unlock zimbra account from command line

Image
How to Lock and Unlock zimbra account from command line. some account sending email spam, you are administrator to need lock account from command line. To login your Mailbox system. To perform some command below to lock and unlock zimbra account. For example, I will lock and unlock account [email protected] . The command line as below running su - zimbra . Now, let's start! Lock and Unlock zimbra account Step 1: Checking status account [email protected] as below: $ zmprov ga huupv02mail.huuphan.com | grep zimbraAccountStatus The display as below: Another command to check status account with zmaccts as below: Step 2: To Lock zimbra account [email protected] $ zmprov ma [email protected] zimbraAccountStatus locked The display as picture below: To check account status after locked Step 3: To Unlock zimbra account [email protected] $ zmprov ma [email protected] zimbraAccountStatus active The display as picture belo

Linux diff command

Image
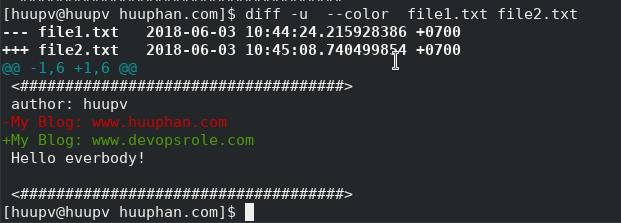
In this tutorial, I use diff command output on screen. How to compare different line by line in  files. How to compare side by side, color , output do not output common lines with diff command. What diff command work? compare files line by line For example my topic, I compare line by line in 2 file: file1.txt and file2.txt The content file1.txt file [huupv@huupv huuphan.com]$ cat file1.txt <####################################> author: huupv My Blog: www.huuphan.com Hello everbody! <####################################> The content file2.txt file [huupv@huupv huuphan.com]$ cat file2.txt <####################################> author: huupv My Blog: www.devopsrole.com Hello everbody! <####################################> The default compare line by line with diff comand [huupv@huupv huuphan.com]$ diff file1.txt file2.txt The output as below: 3c3 < My Blog: www.huuphan.com --- > My Blog: www.devopsrole.com The output number

Postfix only allow whitelisted Recipient Domain

Image
In this tutorial, How to Configure " Postfix only allow whitelisted Recipient Domain ". We test environment with user data. To minimize the risk of sending to unwanted email recipients. Step 1: Add line into main.cf file as below smtpd_recipient_restrictions = check_recipient_access hash:/etc/postfix/recipient_domains, reject Note: Warring /etc/postfix/recipient_domains, reject , Allow receive email in recipient_domain, and REJECT All domain not in whitelisted domain. Step 2: To create recipient domain is the whitelist file mycompany.com OK mail.huuphan.com OK Note: only two domain mycompany.com and mail.huuphan.com receive mail Step 3: To generate hash file: $ sudo postmap /etc/postfix/recipient_domains Step 4: To restart postfix service $ sudo /etc/init.d/postfix restart Now to try sending an email to a another domain not in whitelist. You will find error something like that as below: NOQUEUE: reject: RCPT from …: 554 5.7.1 <[email protected]&g

Bash script arguments from a file content

Image
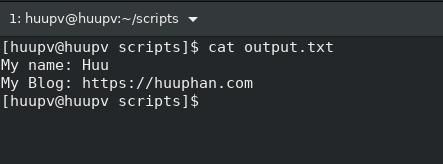
In this tutorial, how to change string content of file as arguments. I written  Bash script arguments from a file content as below: Input file How to change NAME and DOMAIN in input file with any arguments in content as below. My name: NAME My Blog: https:// DOMAIN .com Output file with arguments default value My name: Huu My Blog: https://huuphan.com Output file with arguments another vaule  My name: Devops My Blog: https://devopsroles.com My bash script  $ cat arguments_file.sh The content bash script #!/bin/bash argument1=Huu argument2=huuphan INPUT=/home/huupv/scripts/input.txt OUTPUT=/home/huupv/scripts/output.txt RED='\033[0;31m' NC='\033[0m' # No Color if [ $# -eq 2 ];then     argument1=$1     argument2=$2 fi sed -f - "$INPUT" > "$OUTPUT"<<EOF     s/NAME/$argument1/g     s/DOMAIN/$argument2/g EOF Running bash script with default value $ ./arguments_file.sh The output as picture below: To run

Bash script argument default value and takes optional input arguments

Image
In this tutorial, I have written bash script Bash script argument default value and takes optional input arguments. Using $# argument to input parameter  in bash script. To run bash script with argument default ./def_argument_default.sh The display argument default as below: Running bash script with argument   ./def_argument_default.sh argument1 argument2 argument3 The display bash script with argument as below: My bash script argument default value and takes optional input arguments as below: #!/bin/bash ############### # bash script argument default value # running argument default:  #    ./def_argument_default.sh  # Running optional input argument: #    ./def_argument_default.sh argument1 argument2 argument3 # ############### argument1=HUU argument2=PHAN argument3=www.huuphan.com RED='\033[0;31m' NC='\033[0m' # No Color if [ $# -eq 3 ];then     argument1=$1     argument2=$2     argument3=$3 fi echo -e "First Name: $RED \t$

How to NGINX Solution for Apache ProxyPassReverse

Image
NGINX Solution for Apache ProxyPassReverse Apache configure <VirtualHost myhost:8888>     ServerName myhost     DocumentRoot /path/to/myapp/public     ProxyPass / http://myapp:8080/     ProxyPassReverse / http://myapp:8080/ </VirtualHost> Nginx Reverse Proxy Configure Nginx not have ProxyPassReverse. Therefore a few missing HTTP header. Solve problem Nginx for Apache ProxyPassReverse as below: server {     listen 80;     server_name  www.huuphan.com;     location /home {     proxy_set_header Host $host;         proxy_pass http://IP_Apache:8888;     }     location /app {     proxy_set_header Host $host;         proxy_set_header X-Forwarded-Host $host:$server_port;         proxy_set_header X-Forwarded-Server $host;         proxy_set_header X-Forwarded-For $proxy_add_x_forwarded_for;         proxy_pass http://IP_TOMCAT:8080;     } }

Openssl libssl.so.1.1 not found solve problem

How to solve problem Openssl libssl.so.1.1 not found on your system such as centos, ubuntu. Installing openssl missing depens libssl.so.1.1 not found and libcrypto.so.1.1 not found. Openssl libssl.so.1.1 not found problem as below: [huupv@huupv ~]$ ldd /usr/bin/openssl     linux-vdso.so.1 (0x00007ffe185e6000)     libssl.so.1.1 => => not found     libcrypto.so.1.1 => => not found     libz.so.1 => /lib64/libz.so.1 (0x00007fc3ca6f4000)     libdl.so.2 => /lib64/libdl.so.2 (0x00007fc3ca4f0000)     libpthread.so.0 => /lib64/libpthread.so.0 (0x00007fc3ca2d2000)     libc.so.6 => /lib64/libc.so.6 (0x00007fc3c9f1c000)     /lib64/ld-linux-x86-64.so.2 (0x00007fc3cb2a1000) Openssl libssl.so.1.1 not found solve problem sudo ln -s /usr/local/lib64/libssl.so.1.1 /usr/lib64/libssl.so.1.1 sudo ln -s /usr/local/lib64/libcrypto.so.1.1 /usr/lib64/libcrypto.so.1.1 The result, Openssl libssl.so.1.1 not found solve problem [huupv@huupv ~]$ ldd /usr/bin/openssl     li

sed command regex example

Image
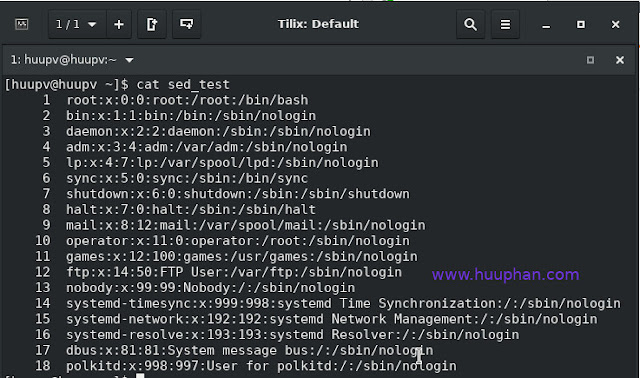
In this tutorial, To use sed command regex such as: Lines starting from A till B printed, how to print between A line to B line , so on. sed command regex example The content sed_test file as picture below: Lines starting from 10 line till 15 line printed  [huupv@huupv ~]$ sed -n '10,12p' sed_test The output as below:     10    operator:x:11:0:operator:/root:/sbin/nologin     11    games:x:12:100:games:/usr/games:/sbin/nologin     12    ftp:x:14:50:FTP User:/var/ftp:/sbin/nologin How to Lines starting from 10 line till end line printed  [huupv@huupv ~]$ sed -n '10,$p' sed_test  The output as picture below: Conclusion   Thought the article, you can printed line to line of file use sed command. How to Lines starting from A line till end line printed 

Configure Postfix to use Gmail as a Mail Relay

In this tutorial, I setup and Configure Postfix to use Gmail as a Mail Relay with 587 port. OS : Centos User : root Install postfix yum install postfix mailx cyrus-sasl cyrus-sasl-plain To configure postfix to use Gmail as a Mail Relay vi /etc/postfix/main.cf Add or modify the following as below: #To use smpt gmail with 587 port relayhost = [smtp.gmail.com]:587 smtp_use_tls = yes smtp_sasl_auth_enable = yes smtp_sasl_security_options = noanonymous smtp_sasl_password_maps = hash:/etc/postfix/sasl_passwd smtp_tls_CAfile = /etc/pki/tls/certs/ca-bundle.crt smtp_tls_security_level = encrypt # Location of CA certificates smtp_tls_CAfile = /etc/ssl/certs/ca-bundle.crt To configure Gmail authentication vi /etc/postfix/sasl_passwd Add the line as below: [smtp.gmail.com]:587    [email protected]:password Running commands as below: chmod 600 /etc/postfix/sasl_passwd chown root:root /etc/postfix/sasl_passwd /etc/postfix/sasl_passwd.db postmap /etc/postfix/sasl_pas

Nginx redirect all http to https

In this tutorial, How to use nginx redirect all http to https. All traffic http redirect to https for your website. How to do it..... For example, nginx.conf file for your website     server {             listen 80;             listen [::]:80;             if ($host = www.huuphan.com) {                return 301 https://$host$request_uri;            }             if ($host = huuphan.com) {               return 301 https://$host$request_uri;             }             server_name www.huuphan.com huuphan.com;             return 444;             #return 301 https://$server_name$request_uri;     }     server {             listen 443 ssl http2;             listen [::]:443 ssl http2;             server_name www.huuphan.com huuphan.com;             access_log off;             error_log /path/to/logs/error.log;             root /path/to/webroot;             index index.php index.html index.htm;             location / {                try_files $uri $uri/ /index.php?$