Posts

Vagrant up error while executing `VBoxManage`

Image
This day, I running vagrant up in my laptop then isuse. I can not start VM in vagrant. My laptop use windows 10. Error code as below: $ vagrant.exe up There was an error while executing `VBoxManage`, a CLI used by Vagrant for controlling VirtualBox. The command and stderr is shown below. Command: ["showvminfo", "600a47e1-9637-4054-89c2-df3e5bf8f691"] Stderr: VBoxManage.exe: error: Code ERROR_MOD_NOT_FOUND 0x8007007E (0x8007007E) - ERROR_MOD_NOT_FOUND 0x8007007E (extended info not available) VBoxManage.exe: error: Context: "GetGuestOSType(osTypeId.raw(), osType.asOutParam())" at line 575 of file VBoxManageInfo.cpp Solve problem There was an error while executing `VBoxManage`, a CLI used by Vagrant for controlling VirtualBox. Step 1: Right click on VirtualBox.exe and select Properties. Step 2: Click the Compatability tab. Click the button that says 'Change settings for all users'. Step 3: In the new window that pops up check '

Zimbra Error 450 4.7.1 sender reject

Image
In this tutorial, How to solve problem "zimbra Error 450 4.7.1 sender reject" on Zimbra MTA. Zimbra Error 450 4.7.1 sender reject as below Feb  10 16:16:33 sd-15xxx postfix/smtpd[1832]: NOQUEUE: reject: RCPT from     unknown[x.x.x.x]: 450 4.7.1 Client host rejected: cannot find your hostname,     [x.x.x.x]; from=<[email protected]> to=<[email protected]>     proto=ESMTP helo=<smtp_sender.com> You can check step by step to solve problem as error above Step 1: Check smtpd_sender_restrictions on zimbra MTA. [zimbra@your_mta ~]$ postconf | grep "smtpd_sender_restrictions" Checking reject_unknown_sender_domain,reject_unknown_client_hostname,reject_invalid_helo_hostname is correct  your environment Step 2: Check server port 10031 on zimbra cbpolicy.   tailf /opt/zimbra/log/cbpolicy.log To check the database have lock? sometime due to cbpolicy. You can solve problem anything else? share your error Zimbra Error 450 4.7.1 sender rej

How to check accounts that are not active in zimbra

In this tutorial, How to check accounts that are not active in zimbra. You can check the vaule zimbraLastLogonTimestamp by account in Zimbra . Zimbra latest version here Script from Zimbra blog #!/bin/bash echo "Username Total Quota Usage Server Last Login Time" zmaccts | grep closed | grep @ | awk '{ print $1 }' | while read ACCOUNT do   QUOTA_TOTAL=`zmprov ga ${ACCOUNT} | grep "zimbraMailQuota" | cut -d ":" -f2`   QUOTA_USAGE=`zmmailbox -z -m ${ACCOUNT} gms`   HOSTED_ON=`zmprov ga ${ACCOUNT} | grep zimbraMailHost | awk -F: '{ print $2 }'`   LAST_ON=`zmprov ga ${ACCOUNT} | grep zimbraLastLogonTimestamp: | awk -F: '{ print $2 }' `   echo "${ACCOUNT} ${QUOTA_TOTAL} ${QUOTA_USAGE} ${HOSTED_ON} ${LAST_ON} " done Or check the command below zmprov ga account | grep zimbraLastLogonTimeStamp You can check other methods? The comment below. Thank you!

How to install 3proxy on centos 7

Image
In this tutorial, How to install 3proxy on centos 7 ? How to configure 3proxy for multiple 3G USB modems. Pre-install The package for Centos 7 $ sudo yum update $ sudo yum -y install wget nano epel-release net-tools $ sudo yum -y groupinstall "Development Tools" $ sudo systemctl stop firewalld && systemctl disable firewalld # For example, My LAB turn off firewalld. Installing 3proxy on Centos 7 $ wget https://github.com/z3APA3A/3proxy/archive/0.8.12.tar.gz $ tar zxfv 3proxy.gz $ cd 3proxy-0.8.12/ $ sudo make -f Makefile.Linux $ sudo mkdir /usr/local/3proxy $ sudo cp src/3proxy /usr/local/3proxy/ $ sudo chmod +x /usr/local/3proxy/3proxy Creating the main configurator 3proxy.cfg file. $ sudo nano /usr/local/3proxy/3proxy.cfg And paste the following content: #!/bin/bash IPv4=`ip addr list enp0s3 | grep " inet " | head -n 1 | cut -d " " -f 6 | cut -d / -f 1` IP=`ip addr list ppp0 | grep " inet " | head -n 1 | cut -d " &quo

How to install wvdial on ubuntu 18.04

In this tutorial, How to install wvdial on ubuntu 18.04. You want to install wvdial for USB 3G/4G Modem. Link download wvdial package for ubuntu 18.04 here . Pre install for ubuntu 18.04 $ sudo apt-get install build-essential Install wvdial on ubuntu 18.04 $ sudo dpkg -i wvdial_1.61-4.1build1_amd64.deb The during install wvdial some error as below: root@serverubuntu:~# dpkg -i wvdial_1.61-4.1build1_amd64.deb Selecting previously unselected package wvdial. (Reading database ... 107834 files and directories currently installed.) Preparing to unpack wvdial_1.61-4.1build1_amd64.deb ... Unpacking wvdial (1.61-4.1build1) ... dpkg: dependency problems prevent configuration of wvdial:  wvdial depends on libuniconf4.6; however:   Package libuniconf4.6 is not installed.  wvdial depends on libwvstreams4.6-base; however:   Package libwvstreams4.6-base is not installed.  wvdial depends on libwvstreams4.6-extras; however:   Package libwvstreams4.6-extras is not installed. dpkg: error proc

INSTALLING AND CONFIGURING USB 3G DATA ON CENTOS/RHEL

In this tutorial, How to installing and configuring USB 3G/4G Data on CENTOS /RHEL. INSTALLING AND CONFIGURING USB 3G DATA ON CENTOS/RHEL To install wvdial usb_modeswitch usb_modeswitch packages for USB 3G modem. $ sudo yum install wvdial usb_modeswitch-data usb_modeswitch To check log $ dmesg | grep tty Plug and connected and detected for USB 3G modem on CENTOS/RHEL. To configure wvdial $ vi /etc/wvdial.conf  The content wvdial file as below [Dialer 3gviettel] Init1 = ATZ Init2 = ATQ0 V1 E1 S0=0 &C1 &D2 +FCLASS=0 Init3 = AT+CGDCONT=1,"IP","e-internet" Stupid Mode = 1 Modem Type = Analog Modem ISDN = 0 Phone = *99# Modem = /dev/ttyUSB0 New PPPD = yes Username = { } Password = { } Baud = 460800 Auto DNS = off check DNS =no Auto Reconnect = on Loading module USB 3G/4G modem $ modprobe usb_wwan usb-storage usbserial Running wvdial for 3gviettel $ wvdial 3gviettel & Yeh, You can add DNS in /etc/resolv.conf fi

Upgrading Fedora 28 to Fedora 29

Image
I using fedora 28 my laptop. Now I will "Upgrading Fedora 28 to Fedora 29" . Fedora 29 was just officially releases . Before not yet Upgrading to Fedora 29. [huupv@huupv huuphan.com]$ cat /etc/redhat-release Fedora release 28 (Twenty Eight) Using the command line to Upgrading Fedora 28 to Fedora 29 Update software and backup your system [huupv@huupv huuphan.com]$ sudo dnf upgrade --refresh Install the DNF plugin [huupv@huupv huuphan.com]$ sudo dnf install dnf-plugin-system-upgrade Start the update with DNF [huupv@huupv huuphan.com]$ sudo dnf system-upgrade download --releasever=29 Reboot and upgrade [huupv@huupv huuphan.com]$ sudo dnf system-upgrade reboot

Zimbra open source iptables memo

In this tutorial, I written Zimbra open source Iptables memo. The setting content is diffrent depending on your environment. Iptables for zimbra SMTP iptables -I INPUT -p tcp --dport 25 -j ACCEPT HTTP iptables -I INPUT -p tcp --dport 80 -j ACCEPT POP3 iptables -I INPUT -p tcp --dport 110 -j ACCEPT IMAP iptables -I INPUT -p tcp --dport 143 -j ACCEPT LDAP iptables -I INPUT -p tcp --dport 389 -j ACCEPT HTTPS iptables -I INPUT -p tcp --dport 443 -j ACCEPT SMTPS iptables -I INPUT -p tcp --dport 465 -j ACCEPT IMAPS iptables -I INPUT -p tcp --dport 993 -j ACCEPT POP3S iptables -I INPUT -p tcp --dport 995 -j ACCEPT VMSVC iptables -I INPUT -p tcp --dport 7025 -j ACCEPT Port for ZCS Web Administration iptables -I INPUT -p tcp --dport 7071 -j ACCEPT To save and restart Iptables /etc/init.d/iptables save /etc/init.d/iptables restart

top command in linux

Image
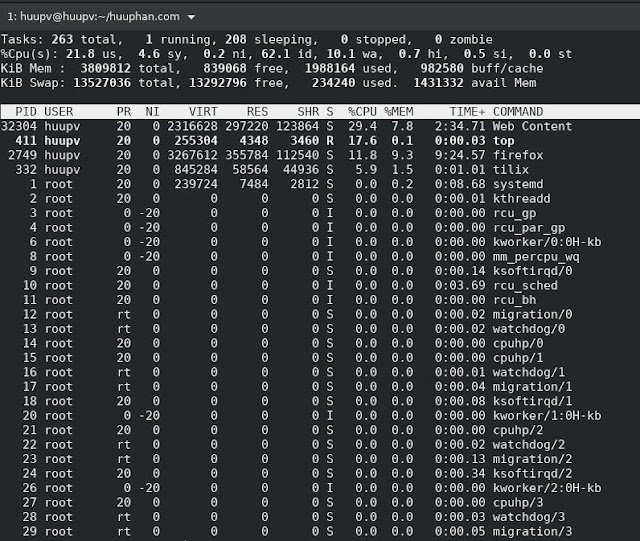
I guide to the Linux " Top command ". The top command allow monitor processes and system resource usage on Linux. It is a best tools for system admin. Top command in linux Getting start top command you can type "top" in terminal very simple. [huupv@huupv huuphan.com]$ top  If you want to quit, then press "q" The screen output terminal as below Top command usage example How to killing processes, sorting the process list, showing full paths, forest view and Listing processes from an user. Killing processes you want to kill a process, press "k" when top command is running and ask for the process ID and press enter. If you leave the process ID blank and hit enter. Sorting the process list The most frequent reasons to use a tool like top is to find out the consuming the most resources. you can press key for sorting list. ‘M’ to sort by memory usage ‘P’ to sort by CPU usage ‘N’ to sort by process ID ‘T’ to sor

mount.nfs stale file handle Solve Problem

How to Solve Problem "mount.nfs stale file handle". Cause, your server reboot or another issue you can not input command terminal server. How do I fix this problem The first, find the directory mount your system. The content /proc/mounts file. [huupv@huupv ~]$ cat /proc/mounts The best solution is to remount directory from NFS client. $ sudo umount -f /mnt/data $ sudo mount -t nfs IP-NFS-SEVER:/path/to/share /mnt/data Conclusion Thought the article, you have fixed "mount.nfs stale file handle Solve Problem as above" . I hope will this your helpful.