Posts

How to setting password policies in Zimbra

Introduction Setting strong password policies in Zimbra is essential for enhancing the security of your email system. By enforcing robust password requirements, you can protect user accounts from unauthorized access and potential security breaches. In this article, we will guide you through the process of configuring password policies in Zimbra, helping you to implement best practices for password security and safeguard your organization's email communications. How to setting password policies in zimbra? To help your system increase security, password strongest. Setting password policies in Zimbra To get all COS use zmprov command su - zimbra zmprov gac -v | grep Password | sort | uniq To display all attributes as below zimbraFeatureChangePasswordEnabled: TRUE zimbraMobilePolicyAllowSimpleDevicePassword: FALSE zimbraMobilePolicyAlphanumericDevicePasswordRequired: FALSE zimbraMobilePolicyDevicePasswordEnabled: TRUE zimbraMobilePolicyDevicePasswordExpiration: 0 zimbraMobile...
How to backup and restore for zimbra mailbox

Introduction Backing up and restoring your Zimbra email system is essential for ensuring data security and continuity. Regular backups protect your organization from data loss due to hardware failures, software issues, or other unforeseen events. In this article, we will guide you through the process of backing up and restoring Zimbra, providing you with the necessary steps to safeguard your email data and ensure seamless recovery when needed. In this tutorial, How to " Backup and restore for zimbra mailbox ". How to backup mailbox for accounts? How to restore mailbox for accounts? Backup and restore for zimbra mailbox The format list_account file as below: huupv1@huuphan.com huupv2@huuphan.com The script backup mailbox for all accounts #!/bin/bash FILE= /tmp/list_account DATE=$(date +"%a") ZMBOX=/opt/zimbra/bin/zmmailbox while read account do      echo "---Generating files from backup $account ---"      $ZMBOX -z -m $account -t...

A Comprehensive Guide to use inotify-tools on centos

inotifywait - wait for changes to files using inotify. When it comes to real-time monitoring of file system events, inotify-tools is an indispensable tool. Especially for CentOS users, mastering inotify-tools can significantly enhance the efficiency of system administration tasks. This guide will walk you through everything you need to know about using inotify-tools on CentOS, from installation to advanced configurations, ensuring that you can leverage its full potential. Introduction to inotify-tools Inotify-tools is a command-line utility that leverages the inotify (inode notify) feature of the Linux kernel, allowing you to monitor file system events. This is incredibly useful for tasks that require real-time responses to file changes, such as automatic backups, log monitoring, and dynamic content updates. Why Use inotify-tools on CentOS? CentOS is widely used in enterprise environments due to its stability and robust performance. By integrating inotify-tools, you can automate and...

How to enable swap-drive on linux: A Step-by-Step Guide

Image
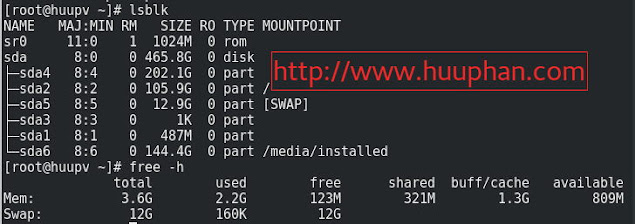
Introduction Learn how to enable swap drive on Linux with this comprehensive guide. We cover everything from checking swap status to making it permanent in your system. Follow these simple steps to fix common issues like "Swap Not Working" on CentOS and Fedora. In Linux, swap space is an essential component that helps your system manage memory more efficiently. When your system runs out of physical RAM, it uses swap space as virtual memory. This is especially crucial when dealing with memory-intensive applications or when your system is running low on RAM. However, issues like "Swap Not Working" can occur, particularly on distributions such as CentOS and Fedora 25. In this guide, we'll walk you through the process of enabling and managing swap space on your Linux system, ensuring that it's set up correctly and permanently. What is Swap Space in Linux? Swap space in Linux is a designated area on your hard drive that the operating system uses as virtual memor...

zimbra 8.6 cbpolicyd : A Practical Example

Introduction The cbpolicyd service in Zimbra is a powerful policy daemon that helps administrators control email traffic, implement rate limiting, and prevent spam. By setting up cbpolicyd with customized policies, you can enhance the security and efficiency of your email system. In this article, we will provide an example configuration for cbpolicyd in Zimbra 8.6, guiding you through the process to help you optimize your email server's performance and security. Links to below you maybe likes: How to zimbra enforce spf checking for incomming email zimbra 8.6 cbpolicyd How to use cbpolicyd to configure 120 message from sender in last 30s. in order configure in zimbra cbpolicyd policies -->policy_members -->quotas -->quotas_limits To create zimbra-example.sql file BEGIN TRANSACTION; INSERT INTO "policies" (ID,Name,Priority,Description) VALUES(6,'Example CBPolicyd Policies', 0, 'Example CBPolicyd Policies'); INSERT INTO "policy_me...

Mastering the screen command on Linux: Installation, Usage, and Troubleshooting

Introduction Learn how to install and effectively use the screen command on CentOS/RHEL and Ubuntu-based systems. This guide covers installation, session management, common issues, and FAQs to enhance your Linux terminal experience. In the world of Linux, the terminal is the heart of operations. Whether you're managing servers, running long processes, or multitasking across various projects, keeping your terminal sessions active and organized is essential.  This is where the screen command comes in—a powerful utility that allows you to run multiple terminal sessions from a single console. This article will guide you through the installation, usage, and troubleshooting of the screen command on Linux systems, ensuring you can manage your terminal sessions like a pro. How to Install the screen Command Before diving into the functionalities of the screen command, it’s important to ensure it’s installed on your system. The installation process varies depending on your Linux distribu...

How to install ibus-bogo on fedora 25: A Comprehensive Guide

Image
Introduction Installing ibus-bogo on Fedora 25 might seem like a daunting task, especially if you're new to Linux. This guide will walk you through the entire process, from downloading the necessary files to configuring ibus-bogo for optimal performance. Whether you're a seasoned Linux user or a beginner, this article is designed to help you get ibus-bogo up and running on your Fedora 25 system. We'll also cover specific configurations for QT-based programs like Skype and provide troubleshooting tips to ensure everything works smoothly. What is ibus-bogo? ibus-bogo is an intelligent input method framework used primarily for typing in different languages. It’s a popular choice among Fedora users, especially those who need to type in multiple languages seamlessly. Fedora 25 users often install ibus-bogo to enhance their typing experience, as it offers a range of features that make switching between languages and input methods easier. Why Install ibus-bogo on Fedora 25? Fedo...

How to install mediawiki on centos 6

Image
Links to below you maybe likes: How to install php7 on centos 6 How to install and configure redmine on centos 6 How to owncloud 9 install ssl certificate centos 7 How To Install the BIND DNS Server on CentOS 6 KeepAlived IP Failover on CentOS & Red Hat How to install mediawiki on centos 6 To require nginx php MySQL Step 1: To update and install epel repo, ntpd #yum update -y #yum install -y epel-release #yum install -y ntp #chkconfig ntpd on #ntpdate pool.ntp.org #service ntpd start Step 2: To install the dependencies #yum install gd sendmail gcc pcre yum-utils wget Step 3:  To install php7 for nginx remi centos 6 Step 4: To install ImageMagick #yum install php-mbstring php-fpm php-devel php-mysql php-pear ImageMagick ImageMagick-devel --enablerepo=remi-php70 #pecl install imagick #echo "extension=imagick.so" > /etc/php.d/imagick.in Step 5: To enable module php-mbstring for nginx #find / -name mbstring.so The result /opt/remi/php70/roo...

Linux basic commands for Every User

Introduction Learn the essential Linux basic commands that every user and administrator should know. From checking your Ubuntu version to managing users, this comprehensive guide provides step-by-step instructions for each command. Linux is a versatile and powerful operating system, popular among both tech enthusiasts and professionals. Whether you are a beginner or an experienced user, mastering the basic commands is crucial for managing and operating a Linux system efficiently. This guide will walk you through the essential Linux commands, helping you understand how to check system information, manage users, and more. By the end of this guide, you'll be equipped with the foundational skills needed to navigate and control your Linux environment with confidence. How to Check Your Ubuntu Version One of the first tasks when working with a Linux system is to know which version of Ubuntu you are running. This information is vital when installing software, troubleshooting issues, or co...

How to install php7 on centos 6: A Step-by-Step Guide

Introduction Learn how to install PHP7 on CentOS 6 using the Remi repository with our detailed step-by-step guide. Includes instructions for setting up PHP7 for Nginx with PHP-FPM and PHP-MySQL. PHP7 brings significant improvements in performance and new features compared to its predecessors. If you're running CentOS 6 and looking to upgrade to PHP7, this guide will help you through the installation process using the Remi repository. We will cover the basic steps and provide additional instructions for setting up PHP7 for Nginx. Prerequisites Before you begin, ensure you have the following: A CentOS 6 server Root access or a user with sudo privileges Step 1: Update the System Start by updating your system to ensure all existing packages are up to date. Copy code yum update -y Step 2: Install Required Packages Install wget and yum-utils to facilitate the installation of the Remi repository. Copy code yum install wget yum-utils -y Step 3: Add the Remi Repository Download and insta...