Posts

Showing posts from July, 2018

Run bash script on boot time on centos

How to Auto Execute Commands/Scripts During Reboot or Startup on centos . Many method to execute a command or run scripts during startup. Method 1: Linux Execute Cron Job After System Reboot Use @reboot in cron scheduler. It will run once, at startup after reboot your system. Edit crontab # crontab -e To run a script called /home/huuphan/auto_excute.sh @reboot /home/huuphan/auto_excute.sh Method 2: Using /etc/rc.d/rc.local file This method is vaild for systemd-based distributions. To grant execute permission to /etc/rc.d/rc.local # chmod +x /etc/rc.d/rc.local And add your script at the bottom of the file /etc/rc.d/rc.local # echo "/home/huuphan/auto_excute.sh" >> /etc/rc.d/rc.local Conclusion In this article, how to Run bash script on boot time on centos. Use two method: Crontab and /etc/rc.d/rc.local file.

Linux create user

Image
In this tutorial, I will guide use useradd create user in linux. The memo complete linux create user and how to user run sudo command with no password. Create user with useradd command Create User test with option: Specific user ID: -u 1234 Specific Group ID: -g 1002 Specific a Group IT and vboxusers: -G IT,vboxusers Specific bash shell: -s /bin/bash Specific the directory: -d /home/test Specific password: Whoami12345678 Running useradd command as below: sudo useradd test -d /home/test -s /bin/bash -u 1234 -g 1002 -G IT,vboxusers  ; echo -e "Whoami12345678\nWhoami12345678\n" | sudo passwd test Use id command verify [huupv@huupv ~]$ id test uid=1234(test) gid=1002(IT) groups=1002(IT),981(vboxusers) User run sudo command with no password [huupv@huupv ~]$ echo "test ALL=(ALL) NOPASSWD:ALL" | sudo tee -a /etc/sudoers To check [huupv@huupv ~]$ sudo visudo -c Verify, you can run sudo without a password [huupv@huupv ~]$ sudo cat /etc/hosts

Shell script parse xml in linux

Image
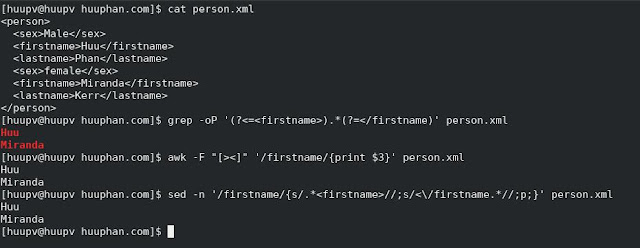
How to use shell script parse xml file . In this tutorial, I will use grep command, awk command and sed command Reading xml file extracting value in linux . For example xml person file as below <person>   <sex>Male</sex>   < firstname >Huu</ firstname >   <lastname>Phan</lastname>   <sex>female</sex>   < firstname >Miranda</ firstname >   <lastname>Kerr</lastname> </person> How to extracting value Huu and Miranda  of < firstname > < /firstname > Use grep command [huupv@huupv huuphan.com]$ grep -oP '(?<=<firstname>).*(?=</firstname)' person.xml Use awk command [huupv@huupv huuphan.com]$ awk -F "[><]" '/firstname/{print $3}' person.xml Use sed command [huupv@huupv huuphan.com]$ sed -n '/firstname/{s/.*<firstname>//;s/<\/firstname.*//;p;}' person.xml  The result, Shell script parse xml in linux

rename command in linux

Image
rename command similar with mv command. This command is slightly more advanced than mv  command. How to rename multiple files in linux. The syntax rename command rename [options] expression replacement-file For example, basic use rename command [huupv@huupv huuphan.com]$  rename file huu file1.txt The same output How to rename all file extension .txt to .atxt file [huupv@huupv huuphan.com]$ rename .txt .atxt *.txt The same output Use option --verbose in rename command [huupv@huupv huuphan.com]$ rename -v foo huu foo?.atxt The same ouput `foo2.atxt' -> `huu2.atxt' `foo3.atxt' -> `huu3.atxt' Details more information rename command man rename

How to setup OpenVPN Server on Centos 7

In this tutorial, I will setup OpenVPN Server on Centos 7.   Step 1: Prepare install OpenVPN server sudo yum update -y sudo yum install epel-release -y sudo yum update -y sudo yum install -y openvpn easy-rsa Configure Ip forwarding for OpenVPN Server vim /etc/sysctl.conf The content sysctl.conf file as below: Packet forwarding net.ipv4.ip_forward = 1   Step 2: Configure OpenVPN Server Open server.conf file vim /etc/openvpn/server.conf The content configure as below: #Secure OpenVPN Server Config #Basic Connection Config dev tun proto udp port 1194 keepalive 10 120 max-clients 4 #Certs ca ca.crt cert server.crt key server.key dh dh.pem tls-auth ta.key 0 #Ciphers and Hardening reneg-sec 0 remote-cert-tls client crl-verify crl.pem tls-version-min 1.2 cipher AES-256-CBC auth SHA512 tls-cipher TLS-DHE-RSA-WITH-AES-256-GCM-SHA384:TLS-DHE-RSA-WITH-AES-256-CBC-SHA256:TLS-DHE-RSA-WITH-AES-128-GCM-SHA256:TLS-DHE-RSA-WITH-AES-128-CBC-SHA256 #D

Failed to create the VirtualBox COM object solve problem

Image
Someday, your Virtualbox not start and the display error "Failed to create the VirtualBox COM object". it got somewhat corrupted. The error of Virtualbox "Failed to create the VirtualBox COM object" as below: Location: '/home/huupv/.config/VirtualBox/VirtualBox.xml' , line 1 (0), column 1. /home/vbox/vbox-5.2.14/src/VBox/Main/src-server/VirtualBoxImpl.cpp[554] (nsresult VirtualBox::init()). How to solve problem! Step 1: make sure process VBoxSVC not running Step 2: make a copy file VirtualBox.xml then delete original file. Step 3: Rename VirtualBox.xml-prev file to VirtualBox.xml file. Step 4: try again start VirtualBox. To check not running process VBoxSVC not running use ps command as below: $ ps -ef | grep VBoxSVC huupv 10122 2421 0 22:19 pts/1 00:00:00 grep --color=auto VBoxSVC To check VirtualBox.xml file and Delete VirtualBox.xml file $ ll /home/huupv/.config/VirtualBox/ | grep VirtualBox.xml -rw-----

How to connect openvpn server from a linux computer

Image
Connect access server (VPS) from a linux computer. In this tutorial, I will access server VPS installed OpenVPN server from a linux computer. Ref to How to setup OpenVPN Server on Centos 7 Install openvpn client on linux Run Openvpn client with .ovpn file for example: client.ovpn Install OpenVPN client on linux  Fedora/CentOS/RedHat client sudo yum install openvpn Ubuntu/Debian client sudo apt-get install openvpn Checking Openvpn client version [huupv@huupv ~]$ openvpn --version The output as below: OpenVPN 2.4.6 x86_64-redhat-linux-gnu [SSL (OpenSSL)] [LZO] [LZ4] [EPOLL] [PKCS11] [MH/PKTINFO] [AEAD] built on Apr 26 2018 library versions: OpenSSL 1.1.0h-fips  27 Mar 2018, LZO 2.08 Running the OpenVPN client linux computer with the downloaded client config ovpn file: [huupv@huupv vpn-client-01-config]$ sudo openvpn --config client.ovpn The output OpenVPN client linux connect to server OpenVPN server as below: Sun Jul  1 21:43:35 2018 TUN/TAP device tun0 open