Posts

Rclone backup all VPS to microsoft onedrive

In this tutorial, How to use Rclone backup all VPS to microsoft onedrive. It's very simple, free to backup all to Cloud with Rclone. Rclone supports a lot of Cloud services Google Drive Amazon S3 Openstack Swift / Rackspace cloud files / Memset Memstore Dropbox Google Cloud Storage Amazon Drive Microsoft OneDrive Hubic Backblaze B2 Yandex Disk SFTP The local filesystem Install Rclone on VPS Link direct download here : I use Ubuntu server on VPS. cd /root/ wget https://downloads.rclone.org/rclone-current-linux-amd64.zip unzip rclone-current-linux-amd64.zip cp rclone-v*-linux-amd64/rclone /usr/sbin/ rm -rf rclone-* Rclone command basic rclone config – Configure the connection to the cloud service. rclone copy – Copy files from server to cloud, skip if data already exists. rclone sync – Synchronize between server and cloud, only update data on cloud. rclone move – Move files from server to cloud. rclone delete – Delete the data of the folder. rclone purge – Deletes the data of the fol

Issue Let's Encrypt certificates for multiple websites Nginx

In this tutorial, How to Issue Let's Encrypt certificates for multiple websites Nginx Let's Encrypt is a free and open-source Prerequisites Ubuntu instance with a LEMP stack installed. Two valid domain name. My example, devopsroles.com and huuphan.com You have access shell login VPS. You neeed install package certbot python3-certbot-nginx on your system. Let's Encrypt Certificates and Nginx Configure Certbot Let's Encrypt certificates for the first website Let's Encrypt free SSL for website. you run command the following certbot --nginx -d huuphan.com you see the following output: root@localhost:~# certbot --nginx -d huuphan.com Saving debug log to /var/log/letsencrypt/letsencrypt.log Plugins selected: Authenticator nginx, Installer nginx Cert not yet due for renewal You have an existing certificate that has exactly the same domains or certificate name you requested and isn't close to expiry. (ref: /etc/letsencrypt/renewal/huuphan.com.conf) What would you like t

How to Install Caddy on Ubuntu

 In this tutorial, How to install Caddy on Ubuntu. The Caddy web server is an open-source web server written in Go. It is designed around simplicity and security that comes with a number of features that are useful for hosting websites. Caddy is both a flexible, efficient static file server and a powerful, scalable reverse proxy. Prerequisites A Ubuntu OS. A root user access or normal user with administrative privileges.  1. Update your system # apt update -y && apt upgrade -y 2. Install Caddy # curl -1sLf 'https://dl.cloudsmith.io/public/caddy/stable/gpg.key' | sudo apt-key add - # curl -1sLf 'https://dl.cloudsmith.io/public/caddy/stable/debian.deb.txt' | sudo tee -a /etc/apt/sources.list.d/caddy-stable.list # apt update After install Caddy on Ubuntu server. # apt install caddy 3. Open your browser and enter your server IP or domain name: http://Server-IP OR http://yourdomain.com 4. Configure Domain with Caddy Create a directory for your website files # mkdir -

How to installing Docker in Raspberry Pi 4

  In this tutorial. How to installing Docker in Raspberry Pi 4 1. Setup OS in the Raspberry Pi I used Ubuntu OS. 2. Update your system $ sudo apt update && sudo apt upgrade 3. Install basic packages $ sudo apt install net-tools git openssh-server Setting up Docker $ sudo apt-get -y install apt-transport-https ca-certificates curl software-properties-common $ curl -fsSL https://download.docker.com/linux/ubuntu/gpg | sudo apt-key add - $ sudo add-apt-repository "deb [arch=arm64] https://download.docker.com/linux/ubuntu $(lsb_release -cs) stable" $ sudo apt-get update $ apt-cache policy docker-ce $ sudo apt-get -y install docker-ce $ sudo usermod -aG docker ${USER} Installing Docker Compose $ sudo apt install python3-pip $ sudo pip3 install docker-compose The basic command docker compose Then deploy the application: $ docker-compose up -d Find what docker-compose is running with the following command: $ docker-compose ps To remove the application $ docker-compose down  

curl command cheat sheet

In this tutorial, I have compiled a comprehensive curl command cheat sheet. Curl is a powerful command-line tool for making HTTP requests and working with various protocols. The cheat sheet is designed to serve as a quick reference guide, providing concise and organized information on the essential curl commands. Whether you're a beginner or an experienced user, this resource aims to simplify the usage of curl commands, helping you navigate and leverage its capabilities efficiently. Feel free to explore the cheat sheet and enhance your proficiency in utilizing curl for various web-related tasks. curl command cheat sheet Option -o <file>       # --output: write to file -u user:pass  # --user: Authentication -v                  # --verbose -s                  # --silent -I                  # --head: headers only -i                  # --include: Include the HTTP-header in the output Request -X POST          # --request -L                     # follow link if page redirects -F  

How to enable SSH 2FA on AlmaLinux

Image
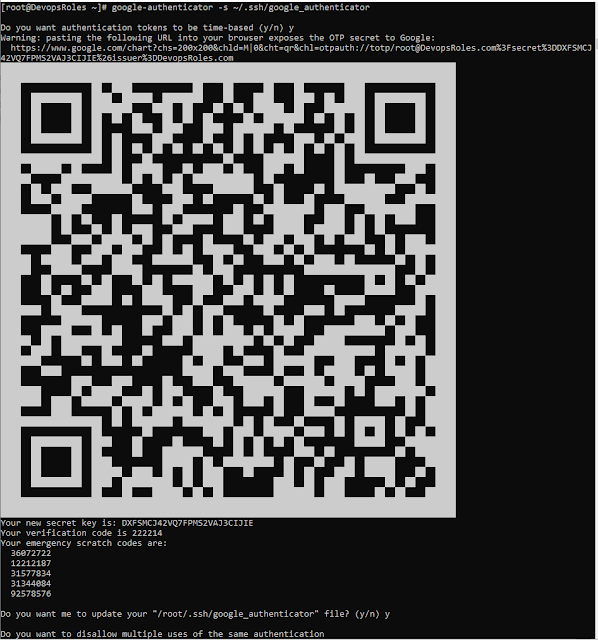
 In this tutorial, How to enable two-factor authentication (2FA) for SSH logins.  Install the Google Authenticator on AlmaLinux sudo dnf install epel-release -y sudo dnf install google-authenticator qrencode qrencode-libs -y After install completes, I will create a new secret key in ~/.ssh directory Run command as follows google-authenticator -s ~/.ssh/google_authenticator The output terminal as below [root@DevopsRoles ~]# google-authenticator -s ~/.ssh/google_authenticator Do you want authentication tokens to be time-based (y/n) y Warning: pasting the following URL into your browser exposes the OTP secret to Google:   https://www.google.com/chart?chs=200x200&chld=M|0&cht=qr&chl=otpauth://totp/[email protected]%3Fsecret%3DDXFSMCJ42VQ7FPMS2VAJ3CIJIE%26issuer%3DDevopsRoles.com Your new secret key is: DXFSMCJ42VQ7FPMS2VAJ3CIJIE Your verification code is 222214 Your emergency scratch codes are:   36072722   12212187   31577834   31344084   92578576 Do you want me to update y

speed test command line linux

Image
 In this tutorial, How to  run a Speedtest from your command line. The requirement Nodejs version > 8+.    Install speed test command line [vagrant@localhost ~]$ wget https://nodejs.org/dist/v14.15.4/node-v14.15.4.tar.gz [vagrant@localhost ~]$ tar xvf node-v14.15.4.tar.gz [vagrant@localhost ~]$ cd node-v14.15.4/ [vagrant@localhost node-v14.15.4]$ sudo ./configure [vagrant@localhost node-v14.15.4]$ sudo make [vagrant@localhost node-v14.15.4]$ sudo make install Use NPM install speed test [vagrant@localhost ~]$ sudo npm install --global speed-test  The result, Install speed-test [vagrant@localhost node-v14.15.4]$ sudo npm install --global speed-test /usr/local/bin/speed-test -> /usr/local/lib/node_modules/speed-test/cli.js + [email protected] updated 2 packages in 10.4s [vagrant@localhost node-v14.15.4]$ Usage speed-test [vagrant@localhost node-v14.15.4]$ speed-test --help   Test your internet connection speed and ping using speedtest.net from the CLI   Usage     $ speed-test   Optio

Rasberry Pi 4 can't connect to WiFi ubuntu server [fixed]

 In this tutorial, How to connect to WiFi ubuntu server on Rasberry Pi  4. Today, I buy Rasberry PI 4 new and install ubuntu 20.04 LTS. root@ubuntu:~# cat /etc/lsb-release DISTRIB_ID=Ubuntu DISTRIB_RELEASE=20.04 DISTRIB_CODENAME=focal DISTRIB_DESCRIPTION="Ubuntu 20.04.1 LTS" root@ubuntu:~#  after finish, Rasberry Pi 4 no identify ip address of wilfi. :D.  Rasberry Pi 4 can't connect to WiFi ubuntu server [fixed] The first, check network interface your system. ll -la /sys/class/net/ Create new file config for wifi " /etc/netplan/wlan.yaml" apply configure and reboot netplan apply The result, as below root@ubuntu:~# ll -la /sys/class/net/ total 0 drwxr-xr-x  2 root root 0 Jan  1  1970 ./ drwxr-xr-x 74 root root 0 Jan  1  1970 ../ lrwxrwxrwx  1 root root 0 Jan  1  1970 eth0 -> ../../devices/platform/scb/fd580000.ethernet/net/eth0/ lrwxrwxrwx  1 root root 0 Jan  1  1970 lo -> ../../devices/virtual/net/lo/ lrwxrwxrwx  1 root root 0 Apr  1  2020 wlan0 -> ../.

How to change the order of columns in the output

In this tutorial, How to change the order of columns in the output of `uniq -c` command. I use read the file and show the unique Name from the file. How many time this name of the file? The content of file as example below [HuuPV@DevopsRoles ~]$ cat devopsroles.txt  huu huu phan van dev devopsroles dev huu huu I use awk, sort uniq command to read file and show the unique Name as example below [HuuPV@DevopsRoles ~]$ cat devopsroles.txt | awk '{print $1}' | sort | uniq -c | sort -nr       4 huu       2 dev       1 van       1 phan       1 devopsroles Now, How to change the order of columns in the output of file [HuuPV@DevopsRoles ~]$ cat devopsroles.txt | awk '{print $1}' | sort | uniq -c | sort -nr | awk '{ print $2,$1}' huu 4 dev 2 van 1 phan 1 devopsroles 1 [HuuPV@DevopsRoles ~]$ cat devopsroles.txt | awk '{print $1}' | sort | uniq -c | sort -nr | awk '{ print $1,$2}' 4 huu 2 dev 1 van 1 phan 1 devopsroles Conclusion  How to change the order of

ntfsfix fix NTFS not mount from Linux

Today, I have not mount usb external USB into Fedora 32. External USB drive is NTFS formatted.  I will installed ntfs-3g  package for fedora as below: sudo dnf install ntfs-3g ntfsprogs The first, check your device address , you run this command as below sudo fdisk -l # or lsblk -f The output device is /dev/sd XY (where X and Y are the letter of the drive's device and Y is the partition number).  So in my case /dev/sdc1 is usb  drive external NTFS formatted. you will replace "device name" with your windows partition ( ex: /dev/sdb1 or /dev/sdd1 .v.v) How to do fix it Now, Open your terminal and run command to fix a Corrupted Windows NTFS Filesystem with Linux [HuuPV@DevopsRoles ~]$ sudo ntfsfix /dev/sdc1 Mounting volume... $MFTMirr does not match $MFT (record 0). FAILED Attempting to correct errors... Processing $MFT and $MFTMirr... Reading $MFT... OK Reading $MFTMirr... OK Comparing $MFTMirr to $MFT... FAILED Correcting differences in $MFTMirr record 0...OK Processing