How To Install the BIND DNS Server on CentOS 6
In my post, I demonstrate how to install and configure the BIND DNS server. I execute the following commands as the root account.
Links to articles you may like:
- How to install php7 on centos 6
- How to install and configure redmine on centos 6
- How to owncloud 9 install ssl certificate centos 7
- How To Install the BIND DNS Server on CentOS 6
- KeepAlived IP Failover on CentOS & Red Hat
To prepare package for BIND DNS server.
yum update -y
yum install bind bind-utils -y
yum -y install perl perl-core wget openssh-clients openssh-server unzip nmap sysstat rsync telnet ntp
ntpdate asia.pool.ntp.org
service ntpd start
chkconfig ntpd on
To configure the static IP address:
# vim /etc/sysconfig/network-scripts/ifcfg-eth1The content is as follows:
DEVICE=eth1To configure hosts file.
TYPE=Ethernet
ONBOOT=yes
NM_CONTROLLED=no
BOOTPROTO=static
IPADDR=192.168.131.10
NETMASK=255.255.255.0
GATEWAY=192.168.131.2
DNS=192.168.131.10
DNS1=8.8.8.8
DNS2=8.8.4.4
USERCTL=no
PEERDNS=no
vim /etc/hostsThe output as bellow
192.168.131.10 ns1.huuphan.local ns1
192.168.131.11 ldap.huuphan.local ldap
192.168.131.12 mta.huuphan.local mta
192.168.131.13 mailbox.huuphan.local mailbox
To configure resolv.conf
vim /etc/resolv.conf
The output as bellow
; generated by /sbin/dhclient-script
search huuphan.local
nameserver 192.168.131.10
nameserver 8.8.8.8
nameserver 8.8.4.4
To configure network file
#vim /etc/sysconfig/networkThe output as bellow
NETWORKING=yes
HOSTNAME=ns1
To configure BIND DNS server
To Create Forward Zone File
vim /var/named/huuphan.local.zoneThe output as bellow
;
; BIND data file for local loopback interface
;
$TTL 604800
@ IN SOA ns1.huuphan.local. admin.huuphan.local. (
3 ; Serial
604800 ; Refresh
86400 ; Retry
2419200 ; Expire
604800 ) ; Negative Cache TTL
;
; name servers - NS records
@ IN NS ns1.huuphan.local.
@ MX 10 mail.huuphan.local.
; name servers - A records
ns1 IN A 192.168.131.10
ldap IN A 192.168.131.11
mta IN A 192.168.131.12
mailbox IN A 192.168.131.13
To Create Reverse Zone File
vim /var/named/131.168.192.revThe output as bellow
;To add lines in named.conf file.
; BIND reverse data file for local loopback interface
;
$TTL 604800
@ IN SOA ns1.huuphan.local. admin.huuphan.local. (
1 ; Serial
604800 ; Refresh
86400 ; Retry
2419200 ; Expire
604800 ) ; Negative Cache TTL
;
; name servers
@ IN NS ns1.huuphan.local.
; PTR Records
11 IN PTR ldap.huuphan.local.
12 IN PTR mta.huuphan.local.
13 IN PTR mailbox.huuphan.local.
vim /etc/named.conf
The output as bellow
# Forward DNSTo restart and enable DNS bind
zone "huuphan.local" IN {
allow-update { none; };
file "/var/named/huuphan.local.zone";
type master;
};
# Reverse DNS
zone "131.168.192.in-addr.arpa" in {
allow-update { none; };
file "/var/named/131.168.192.rev";
type master;
};
service named restart
chkconfig named on
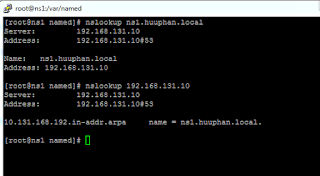
To test BIND DNS
nslookup command hostnslookup ns1.huuphan.localThe output as bellow
nslookup command ip address
Server: 192.168.131.10
Address: 192.168.131.10#53
Name: ns1.huuphan.local
Address: 192.168.131.10
nslookup 192.168.131.10
The output as bellow
Server: 192.168.131.10
Address: 192.168.131.10#53
10.131.168.192.in-addr.arpa name = ns1.huuphan.local.

Comments
Post a Comment