Posts

Showing posts with the label How To

How to configure ntp client server

Image
CentOS / Red Hat Configure ntp(Network time protocol) client server synchronised. NTP client ----> NTP server (192.16.1.10) To configure ntp on ntp server To configure allow port 123 on IPtables firewalls cat /etc/sysconfig/iptables The output as bellow -A INPUT -p tcp -m state --state NEW --dport 123 -j ACCEPT -A INPUT -p udp -m state --state NEW --dport 123 -j ACCEPT To configure ntp.conf file restrict 127.0.0.1 restrict 192.16.1.0 netmask 255.255.255.0 nomodify notrap restrict 172.235.0.0 netmask 255.255.0.0 nomodify notrap restrict -6 ::1 server 0.centos.pool.ntp.org iburst server 1.centos.pool.ntp.org iburst server 2.centos.pool.ntp.org iburst server 3.centos.pool.ntp.org iburst server 0.asia.pool.ntp.org server 1.asia.pool.ntp.org server 2.asia.pool.ntp.org server 3.asia.pool.ntp.org To configure ntp on ntp client To configure allow port 123 on IPtables firewalls cat /etc/sysconfig/iptables The output as bellow -A OUTPUT -d 192.16.1.10/32 -m state --stat
How to enable swap-drive on linux

Image
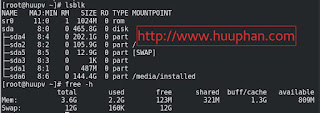
in my post, How to enable swap-drive on linux. The solve problem "Swap Not working" on linux such as centos, Fedora 25.  The open terminal, to check status of swap space ( as run root account) . swapon -s lsblk As the content below NAME   MAJ:MIN RM   SIZE RO TYPE MOUNTPOINT sr0     11:0    1  1024M  0 rom sda      8:0    0 465.8G  0 disk ├─sda4   8:4    0 202.1G  0 part ├─sda2   8:2    0 105.9G  0 part / ├─sda5   8:5    0  12.9G  0 part [SWAP] ├─sda3   8:3    0     1K  0 part ├─sda1   8:1    0   487M  0 part └─sda6   8:6    0 144.4G  0 part /media/installed To turn on swap-drive /dev/sda5 swapon /dev/sda5 To make this permanent start-up on the system vim /etc/fstab  As the content below /dev/sda5 swap swap defaults 0 0 To check, if swap drive that work! free -h As the content below               total        used        free      shared  buff/cache   available Mem:           3.6G        2.2G        123M        321M        1.3G        

How to install ibus-bogo on fedora 25

Image
How to install ibus-bogo on fedora 25. I'm running commands as privileged ! To download ibus-bogo-0.4-12.fc26.noarch.rpm wget https://kojipkgs.fedoraproject.org//packages/ibus-bogo/0.4/12.fc26/noarch/ibus-bogo-0.4-12.fc26.noarch.rpm To install ibus-bogoon fedora 25 sudo rpm -ivh ibus-bogo-0.4-12.fc26.noarch.rpm  To configure ibus-bogo on fedora 25 ibus-daemon & ibus restart ibus-setup  Note: for program writen QT, example: skype... vim ~/.bash_profile The content as following: export GTK_IM_MODULE=ibus export QT4_IM_MODULE=xim export QT_IM_MODULE=xim export XMODIFIERS=@im=ibus To after, logout and login. Thanks for reading!

How to install mediawiki on centos 6

Image
Links to below you maybe likes: How to install php7 on centos 6 How to install and configure redmine on centos 6 How to owncloud 9 install ssl certificate centos 7 How To Install the BIND DNS Server on CentOS 6 KeepAlived IP Failover on CentOS & Red Hat How to install mediawiki on centos 6 To require nginx php MySQL Step 1: To update and install epel repo, ntpd #yum update -y #yum install -y epel-release #yum install -y ntp #chkconfig ntpd on #ntpdate pool.ntp.org #service ntpd start Step 2: To install the dependencies #yum install gd sendmail gcc pcre yum-utils wget Step 3:  To install php7 for nginx remi centos 6 Step 4: To install ImageMagick #yum install php-mbstring php-fpm php-devel php-mysql php-pear ImageMagick ImageMagick-devel --enablerepo=remi-php70 #pecl install imagick #echo "extension=imagick.so" > /etc/php.d/imagick.in Step 5: To enable module php-mbstring for nginx #find / -name mbstring.so The result /opt/remi/php70/roo

How to install php7 on centos 6

Image
How to install php7 on centos 6, I'm use remi repo to install remi-php70. I'm running commands as root account. To install php7  yum install wget yum-utils wget http://rpms.famillecollet.com/enterprise/remi-release-6.rpm rpm -Uvh remi-release-6.rpm yum-config-manager --enable remi-php70 yum install php --enablerepo=remi-php70 To check for available repositories yum repolist For example: To install php7 for nginx ( Due to, nginx use php-fpm and php-mysql) yum install php-fpm php-mysql --enablerepo=remi-php70 Thanks for reading! How to install php7 on centos 6

How to install and configure redmine on centos 6

Image
How to install and configure redmine on centos 6. I'm running commands as root account! Links to below you maybe likes: How to install php7 on centos 6 How to install and configure redmine on centos 6 How to owncloud 9 install ssl certificate centos 7 How To Install the BIND DNS Server on CentOS 6 KeepAlived IP Failover on CentOS & Red Hat To require install redmine on centos 6 CentOS is installed and works Nginx   is installed and works MySQL is installed and works Your are logged as root To install the the dependence packages yum update yum install -y wget gcc gcc-c++ mysql-server mysql-devel openssl-devel readline-devel zlib-devel curl-devel libxslt-devel pcre ImageMagick-devel yum install -y epel-release  yum install -y ntp chkconfig ntpd on ntpdate pool.ntp.org service ntpd start To install ruby on centos 6 cd /usr/local/src/ wget -qO- https://cache.ruby-lang.org/pub/ruby/stable/ruby-2.3.4.tar.gz | tar xvz cd ruby-2.3.4/ ./configure --disable-inst

curl: (35) SSL connect error

Image
How to solve problem " curl: (35) SSL connect error " For example, curl command to https://huuphan.com error and appear code 35 error as below [root@huupv httpdocs]# curl -v https://huuphan.com * About to connect() to huuphan.local port 443 (#0) *   Trying xxx.xxx.xxx.xxx... connected * Connected to huuphan.com (xxx.xxx.xxx.xxx) port 443 (#0) * Initializing NSS with certpath: sql:/etc/pki/nssdb *   CAfile: /etc/pki/tls/certs/ca-bundle.crt   CApath: none * NSS error -5990 * Closing connection #0 * SSL connect error curl: (35) SSL connect error Solve problem: To update curl and nss package For centos: # yum update curl nss For ubuntu: #apt-get update curl nss

How to owncloud 9 install ssl certificate centos 7

Image
How to owncloud 9 install ssl certificate centos 7. in the previous, how to install owncloud 9 in centos 7 To install  mod SSL #yum install mod_ssl To create new certificate #mkdir /etc/httpd/ssl #openssl req -x509 -nodes -days 365 -newkey rsa:2048 -keyout /etc/httpd/ssl/owncloud.key -out /etc/httpd/ssl/owncloud.pem Adjusting /etc/httpd/conf.d/owncloud.conf file <VirtualHost *:80>     DocumentRoot /var/www/html/owncloud/     Redirect permanent / https://172.16.235.145/     <Directory /var/www/html/owncloud>         Options FollowSymLinks MultiViews         AllowOverride ALL         Order allow,deny         allow from all     </Directory> </VirtualHost> <VirtualHost *:443>     SSLEngine on     SSLCertificateFile /etc/httpd/ssl/owncloud.pem     SSLCertificateKeyFile /etc/httpd/ssl/owncloud.key     DocumentRoot /var/www/html/owncloud/     <Directory /var/www/html/owncloud>         Options FollowSymLinks MultiViews    

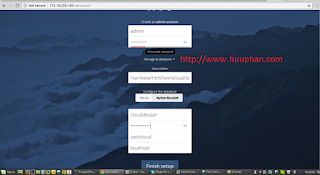
How to install owncloud 9 centos 7

Image
How to install owncloud 9 on centos 7. I'm use bash script to install owncloud 9 on centos 7. Links to below you maybe likes: How to install php7 on centos 6 How to install and configure redmine on centos 6 How to owncloud 9 install ssl certificate centos 7 How To Install the BIND DNS Server on CentOS 6 KeepAlived IP Failover on CentOS & Red Hat #!/bin/bash #Full Name: Phan Van Huu #My Blog: www.huuphan.com #How to install owncloud 9 centos 7 #To update centos 7 echo -e "Updating pack for centos 7\n" yum install -y vim wget yum -y update #To install Mariadb server for centos 7 echo -e "Installing MariaDB server for centos 7\n" yum install -y mariadb-server systemctl enable mariadb systemctl start mariadb #To set password root for MariaDB server echo -e "To set password root for MariaDB server\n" mysqld_safe --skip-grant-tables --skip-networking & 1>/dev/null mysql -u root -e 'FLUSH PRIVILEGES;' mysql -u root -e

How to ssh tunnel in linux

Image
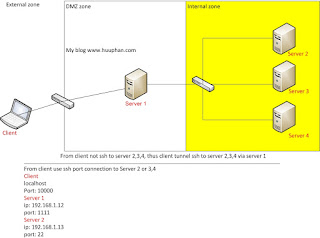
How to ssh port forwarding ( ssh tunneling) in linux. For example, Client [localhost:10000] ---> Server 1 [port:1111]----->Server 2 [port:22] Server 1 ip address: 192.168.1.12 port: 1111 Server 2 ip address: 192.168.1.13 port: 22 From client, how to login ssh to Server2 via Server1. ssh -p 1111 -f [email protected] -L 10000:[email protected]:22  -N ssh -p 10000 root@localhost From client, how to copy files to Server2? scp -r -P 10000 /path/to/file root@localhost:/path/to/folder

How to Setup Chroot SFTP in Linux

Image
How to Setup Chroot SFTP in Linux, it's allow only SFTP, not SSH. I'm running commands as root account. Step 1: To create group groupadd sftpusers Step 2: To create user useradd -g sftpusers -d /home/huupv -s /sbin/nologin huupv passwd huupv Step 3: Setup sftp-server Subsystem in sshd_config  vim /etc/ssh/sshd_config The output as bellow #Subsystem       sftp    /usr/libexec/openssh/sftp-server Subsystem       sftp    internal-sftp Step 4: Specify Chroot Directory for a Group vim /etc/ssh/sshd_config Adding line as following Match Group sftpusers         ChrootDirectory /sftp/%u         ForceCommand internal-sftp Step 5: To create sftp Home Directory mkdir -p /sftp/huupv/home/huupv Step 6: To setup Appropriate Permission chown huupv:sftpusers /sftp/huupv/home/huupv service sshd restart Test chroot sftp To connect from client ssh to server. ssh [email protected] The output as bellow [email protected]'s password: This service all

KeepAlived IP Failover on CentOS & Red Hat

Image
Links to below you maybe likes: How to install php7 on centos 6 How to install and configure redmine on centos 6 How to owncloud 9 install ssl certificate centos 7 How To Install the BIND DNS Server on CentOS 6 KeepAlived IP Failover on CentOS & Red Hat Keepalived use highly available to make Virtual IP call VIP . it's a linux implementation make of VRRP my post, use keepAlived IP Failover on CentOS & Red Hat. I'm running commands as root account. Links to below you maybe likes: How to install php7 on centos 6 How to install and configure redmine on centos 6 How to owncloud 9 install ssl certificate centos 7 How To Install the BIND DNS Server on CentOS 6 KeepAlived IP Failover on CentOS & Red Hat To install keepalived on centos  yum update -y yum install -y keepalived To configure keepalived On Node 1 ! Configuration File for keepalived global_defs {    notification_email {      [email protected]      [email protected]    }    notif

How to create LVM in centos 6

Image
in this post, I'm demo "How to create LVM in centos 6". To run commands as root account!. The scripts for create LVM ( Logical Volume Management ): OS: Centos HDD1: /dev/sdb HDD2: /dev/sdc Step 1: Adding a new partition use fdisk command fdisk /dev/sdb1 fdisk /dev/sdc1 The output as bellow Command (m for help): m Command action    a   toggle a bootable flag    b   edit bsd disklabel    c   toggle the dos compatibility flag    d   delete a partition    l   list known partition types    m   print this menu    n   add a new partition    o   create a new empty DOS partition table    p   print the partition table    q   quit without saving changes    s   create a new empty Sun disklabel    t   change a partition's system id    u   change display/entry units    v   verify the partition table    w   write table to disk and exit    x   extra functionality (experts only) Command (m for help): n Command action    e   extended    p   primary

How to installing and configuring DRBD

Image
The scenario  install and configure DRBD Node1: FQDN: node1.huuphan.local HDD1: 10GB (/dev/sda1) HDD2: 1GB (/dev/sdb1) Node2: FQDN: node2.huuphan.local HDD1: 10GB (/dev/sda1) HDD2: 1GB (/dev/sdb1) Note:  device /dev/sdb a unpartitioned for 2 node. Selinux: disabled mode sed -i 's/SELINUX=enforcing/SELINUX=disable/' /etc/sysconfig/selinux To installing NTP for two node yum install ntp ntpdate -y To iptables firewall to allow 7788 port iptables -I eth1 -m state --state NEW -m tcp -p tcp --dport 7788 -j ACCEPT service iptables save To configure /etc/hosts file vim /etc/hosts The output as bellow 172.16.235.145 node1.huuphan.local node1 172.16.235.146 node2.huuphan.local node2 To create /dev/sdb1 device  for two node fdisk -l fdisk /dev/sdb The output as bellow Device contains neither a valid DOS partition table, nor Sun, SGI or OSF disklabel Building a new DOS disklabel with disk identifier 0xa3977c63. Changes will remain in memory only, un

How To Install the BIND DNS Server on CentOS 6

Image
In my post, I demonstrate how to install and configure the BIND DNS server. I execute the following commands as the root account. Links to articles you may like: How to install php7 on centos 6 How to install and configure redmine on centos 6 How to owncloud 9 install ssl certificate centos 7 How To Install the BIND DNS Server on CentOS 6 KeepAlived IP Failover on CentOS & Red Hat To prepare package for BIND DNS server. yum update -y yum install bind bind-utils -y yum -y install perl perl-core wget openssh-clients openssh-server unzip nmap sysstat rsync telnet ntp ntpdate asia.pool.ntp.org service ntpd start chkconfig ntpd on To configure the static IP address: # vim /etc/sysconfig/network-scripts/ifcfg-eth1 The content is as follows: DEVICE=eth1 TYPE=Ethernet ONBOOT=yes NM_CONTROLLED=no BOOTPROTO=static IPADDR=192.168.131.10 NETMASK=255.255.255.0 GATEWAY=192.168.131.2 DNS=192.168.131.10 DNS1=8.8.8.8 DNS2=8.8.4.4 USERCTL=no PEERDNS=no To configure hosts file. vi