Posts

Showing posts with the label How To

curl: (35) SSL connect error

Image
How to solve problem " curl: (35) SSL connect error " For example, curl command to https://huuphan.com error and appear code 35 error as below [root@huupv httpdocs]# curl -v https://huuphan.com * About to connect() to huuphan.local port 443 (#0) *   Trying xxx.xxx.xxx.xxx... connected * Connected to huuphan.com (xxx.xxx.xxx.xxx) port 443 (#0) * Initializing NSS with certpath: sql:/etc/pki/nssdb *   CAfile: /etc/pki/tls/certs/ca-bundle.crt   CApath: none * NSS error -5990 * Closing connection #0 * SSL connect error curl: (35) SSL connect error Solve problem: To update curl and nss package For centos: # yum update curl nss For ubuntu: #apt-get update curl nss
How to owncloud 9 install ssl certificate centos 7

Image
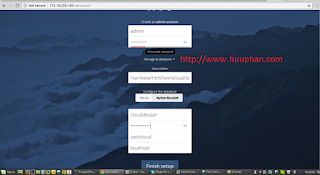
How to owncloud 9 install ssl certificate centos 7. in the previous, how to install owncloud 9 in centos 7 To install  mod SSL #yum install mod_ssl To create new certificate #mkdir /etc/httpd/ssl #openssl req -x509 -nodes -days 365 -newkey rsa:2048 -keyout /etc/httpd/ssl/owncloud.key -out /etc/httpd/ssl/owncloud.pem Adjusting /etc/httpd/conf.d/owncloud.conf file <VirtualHost *:80>     DocumentRoot /var/www/html/owncloud/     Redirect permanent / https://172.16.235.145/     <Directory /var/www/html/owncloud>         Options FollowSymLinks MultiViews         AllowOverride ALL         Order allow,deny         allow from all     </Directory> </VirtualHost> <VirtualHost *:443>     SSLEngine on     SSLCertificateFile /etc/httpd/ssl/owncloud.pem     SSLCertificateKeyFile /etc/httpd/ssl/owncloud.key     DocumentRoot /var/www/html/owncloud/     <Directory /var/www/html/owncloud>         Options FollowSymLinks MultiViews    

How to install owncloud 9 centos 7

Image
How to install owncloud 9 on centos 7. I'm use bash script to install owncloud 9 on centos 7. Links to below you maybe likes: How to install php7 on centos 6 How to install and configure redmine on centos 6 How to owncloud 9 install ssl certificate centos 7 How To Install the BIND DNS Server on CentOS 6 KeepAlived IP Failover on CentOS & Red Hat #!/bin/bash #Full Name: Phan Van Huu #My Blog: www.huuphan.com #How to install owncloud 9 centos 7 #To update centos 7 echo -e "Updating pack for centos 7\n" yum install -y vim wget yum -y update #To install Mariadb server for centos 7 echo -e "Installing MariaDB server for centos 7\n" yum install -y mariadb-server systemctl enable mariadb systemctl start mariadb #To set password root for MariaDB server echo -e "To set password root for MariaDB server\n" mysqld_safe --skip-grant-tables --skip-networking & 1>/dev/null mysql -u root -e 'FLUSH PRIVILEGES;' mysql -u root -e

How to ssh tunnel in linux

Image
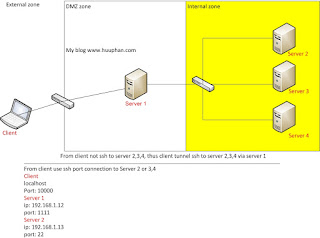
How to ssh port forwarding ( ssh tunneling) in linux. For example, Client [localhost:10000] ---> Server 1 [port:1111]----->Server 2 [port:22] Server 1 ip address: 192.168.1.12 port: 1111 Server 2 ip address: 192.168.1.13 port: 22 From client, how to login ssh to Server2 via Server1. ssh -p 1111 -f [email protected] -L 10000:[email protected]:22  -N ssh -p 10000 root@localhost From client, how to copy files to Server2? scp -r -P 10000 /path/to/file root@localhost:/path/to/folder

How to Setup Chroot SFTP in Linux

Image
How to Setup Chroot SFTP in Linux, it's allow only SFTP, not SSH. I'm running commands as root account. Step 1: To create group groupadd sftpusers Step 2: To create user useradd -g sftpusers -d /home/huupv -s /sbin/nologin huupv passwd huupv Step 3: Setup sftp-server Subsystem in sshd_config  vim /etc/ssh/sshd_config The output as bellow #Subsystem       sftp    /usr/libexec/openssh/sftp-server Subsystem       sftp    internal-sftp Step 4: Specify Chroot Directory for a Group vim /etc/ssh/sshd_config Adding line as following Match Group sftpusers         ChrootDirectory /sftp/%u         ForceCommand internal-sftp Step 5: To create sftp Home Directory mkdir -p /sftp/huupv/home/huupv Step 6: To setup Appropriate Permission chown huupv:sftpusers /sftp/huupv/home/huupv service sshd restart Test chroot sftp To connect from client ssh to server. ssh [email protected] The output as bellow [email protected]'s password: This service all

KeepAlived IP Failover on CentOS & Red Hat

Image
Links to below you maybe likes: How to install php7 on centos 6 How to install and configure redmine on centos 6 How to owncloud 9 install ssl certificate centos 7 How To Install the BIND DNS Server on CentOS 6 KeepAlived IP Failover on CentOS & Red Hat Keepalived use highly available to make Virtual IP call VIP . it's a linux implementation make of VRRP my post, use keepAlived IP Failover on CentOS & Red Hat. I'm running commands as root account. Links to below you maybe likes: How to install php7 on centos 6 How to install and configure redmine on centos 6 How to owncloud 9 install ssl certificate centos 7 How To Install the BIND DNS Server on CentOS 6 KeepAlived IP Failover on CentOS & Red Hat To install keepalived on centos  yum update -y yum install -y keepalived To configure keepalived On Node 1 ! Configuration File for keepalived global_defs {    notification_email {      [email protected]      [email protected]    }    notif

How to create LVM in centos 6

Image
in this post, I'm demo "How to create LVM in centos 6". To run commands as root account!. The scripts for create LVM ( Logical Volume Management ): OS: Centos HDD1: /dev/sdb HDD2: /dev/sdc Step 1: Adding a new partition use fdisk command fdisk /dev/sdb1 fdisk /dev/sdc1 The output as bellow Command (m for help): m Command action    a   toggle a bootable flag    b   edit bsd disklabel    c   toggle the dos compatibility flag    d   delete a partition    l   list known partition types    m   print this menu    n   add a new partition    o   create a new empty DOS partition table    p   print the partition table    q   quit without saving changes    s   create a new empty Sun disklabel    t   change a partition's system id    u   change display/entry units    v   verify the partition table    w   write table to disk and exit    x   extra functionality (experts only) Command (m for help): n Command action    e   extended    p   primary

How to installing and configuring DRBD

Image
The scenario  install and configure DRBD Node1: FQDN: node1.huuphan.local HDD1: 10GB (/dev/sda1) HDD2: 1GB (/dev/sdb1) Node2: FQDN: node2.huuphan.local HDD1: 10GB (/dev/sda1) HDD2: 1GB (/dev/sdb1) Note:  device /dev/sdb a unpartitioned for 2 node. Selinux: disabled mode sed -i 's/SELINUX=enforcing/SELINUX=disable/' /etc/sysconfig/selinux To installing NTP for two node yum install ntp ntpdate -y To iptables firewall to allow 7788 port iptables -I eth1 -m state --state NEW -m tcp -p tcp --dport 7788 -j ACCEPT service iptables save To configure /etc/hosts file vim /etc/hosts The output as bellow 172.16.235.145 node1.huuphan.local node1 172.16.235.146 node2.huuphan.local node2 To create /dev/sdb1 device  for two node fdisk -l fdisk /dev/sdb The output as bellow Device contains neither a valid DOS partition table, nor Sun, SGI or OSF disklabel Building a new DOS disklabel with disk identifier 0xa3977c63. Changes will remain in memory only, un

How To Install the BIND DNS Server on CentOS 6

Image
In my post, I demonstrate how to install and configure the BIND DNS server. I execute the following commands as the root account. Links to articles you may like: How to install php7 on centos 6 How to install and configure redmine on centos 6 How to owncloud 9 install ssl certificate centos 7 How To Install the BIND DNS Server on CentOS 6 KeepAlived IP Failover on CentOS & Red Hat To prepare package for BIND DNS server. yum update -y yum install bind bind-utils -y yum -y install perl perl-core wget openssh-clients openssh-server unzip nmap sysstat rsync telnet ntp ntpdate asia.pool.ntp.org service ntpd start chkconfig ntpd on To configure the static IP address: # vim /etc/sysconfig/network-scripts/ifcfg-eth1 The content is as follows: DEVICE=eth1 TYPE=Ethernet ONBOOT=yes NM_CONTROLLED=no BOOTPROTO=static IPADDR=192.168.131.10 NETMASK=255.255.255.0 GATEWAY=192.168.131.2 DNS=192.168.131.10 DNS1=8.8.8.8 DNS2=8.8.4.4 USERCTL=no PEERDNS=no To configure hosts file. vi